Showing posts with label Blogger Tutorial. Show all posts

Friday, 16 October 2015

How to Create links on Blogger Post

Well, this time I make a basic simple tutorial. For all advanced geek who read this blog, please ignore this post... I just wanna help myself not to teach the same basic thing on every newbies friends that really need help.
OK guys, back to the howto...
There are two ways to create a hyperlink on your blog post. One is the simple GUI way and the other is coders way. I prefer the coder way as I can have more control on it.
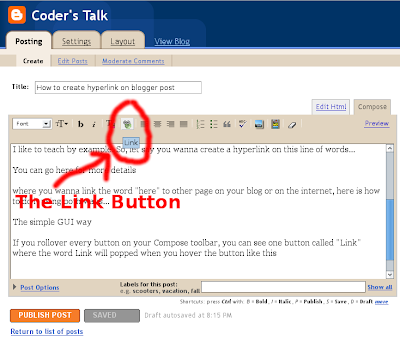
I like to teach by example. So, let say you wanna create a hyperlink on this line of words...
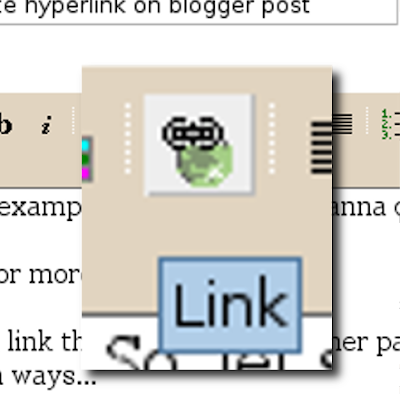
If you rollover every button on your Compose toolbar, you can see one button called "Link" where the word Link will pop up when you hover the button like this:
Now, all you have to do is to highlight or select the word "here" on that phrase, click the link button or press Ctrl+Shift+A, type or paste the URL (the link address) and press Enter or click OK.
Pretty fast huh?... here is the slow motion...
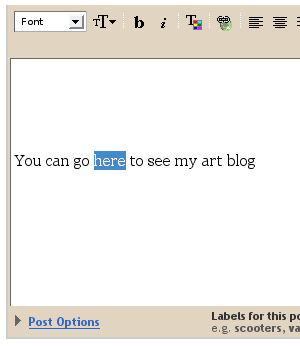
1. Select the word "here"
2. Click on the Link Button or press Ctrl+Shift+A
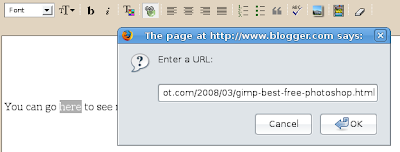
3. Type or paste your link address (Um... technically it is called URL) and click OK
Source
more information please visit -> http://coderstalk.blogspot.ae/2008/04/how-to-create-hyperlink-on-blogger-post.html
How to create Links blogger or blogspot Sidebar

Adding links to the side bar of your blog really adds functionality and interest to your blog.

Firstly copy the URL web address of the website you want to link to.
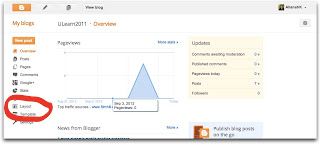
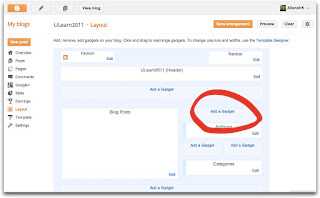
To add a gadget go to the OVERVIEW. Then go to the LAYOUT.
Click on ADD A GADGET.

Scroll down the list until you find Link List and click the plus button.

Write the title of the list- like Maths or Spelling or just 'Links'.
Copy the URL web address in the box. Write in the website name.

Click add link and then SAVE.
To add further links VIEW the blog and click on the spanner to edit the Link List.

Repeat what you did before but you won't need to write a new title.

After you have added the new link into your list you will see the two links. Use the up and down arrows to change the order of the links.
Click save and update.
Source
more information please visit -> http://bling4yrblog.blogspot.ae/2007/01/adding-links-to-your-blog.html

How to create Picture Link in Blogger Posts


By default, when a user clicks a picture in a Blogger post, the picture opens up in a light box. However, you can also create a picture link so that when a user clicks a picture, a new blog or a website will open. For example, the above image is linked to this post itself which is very handy. In this tutorial, I'll explain how you can link a picture to any blog or webpage.
Default Behavior of an Uploaded Image!
I've uploaded the following image and did not change anything in it. Click and it will open in a light box:

Let's link the above image to some blog or webpage.
Creating an Image Link in the New Post Editor
First of all, upload an image. I'll upload the above image in my post. After that, switch to the HTML mode of post editor.

HTML mode shows the HTML code of uploaded image. By default, Compose mode is enabled which is easy but doesn't allow code editing. Anyway, here is the code of my uploaded image:
<div class="separator" style="clear: both; text-align: center;"> <a href="https://blogger.googleusercontent.com/img/b/R29vZ2xl/AVvXsEiU6BaE4B51gBRnm_jkVfRvhAaSHwPInzt5AQ_JosbjPHS-Uw0_vfexAhhVa6iCLfzI_SCcv2V7kpMlsbsj73hXLPLGT2RtYNz9ssmL1cCvXc6PDfSgHzKrzu9YqfcB22ZUmUpmkWxYqXs/s1600/flower.jpg" imageanchor="1" style="margin-left:1em; margin-right:1em"><img border="0" height="225" width="300" src="https://blogger.googleusercontent.com/img/b/R29vZ2xl/AVvXsEiU6BaE4B51gBRnm_jkVfRvhAaSHwPInzt5AQ_JosbjPHS-Uw0_vfexAhhVa6iCLfzI_SCcv2V7kpMlsbsj73hXLPLGT2RtYNz9ssmL1cCvXc6PDfSgHzKrzu9YqfcB22ZUmUpmkWxYqXs/s400/flower.jpg" /></a></div>

Note: Don't worry, your code will not be exactly the same because different images have different names, dimensions and alignment.
Please note that there will be 2 addresses or URLs in the uploaded image. For my image, these URLs are:
https://blogger.googleusercontent.com/img/b/R29vZ2xl/AVvXsEiU6BaE4B51gBRnm_jkVfRvhAaSHwPInzt5AQ_JosbjPHS-Uw0_vfexAhhVa6iCLfzI_SCcv2V7kpMlsbsj73hXLPLGT2RtYNz9ssmL1cCvXc6PDfSgHzKrzu9YqfcB22ZUmUpmkWxYqXs/s1600/flower.jpg & https://blogger.googleusercontent.com/img/b/R29vZ2xl/AVvXsEiU6BaE4B51gBRnm_jkVfRvhAaSHwPInzt5AQ_JosbjPHS-Uw0_vfexAhhVa6iCLfzI_SCcv2V7kpMlsbsj73hXLPLGT2RtYNz9ssmL1cCvXc6PDfSgHzKrzu9YqfcB22ZUmUpmkWxYqXs/s400/flower.jpg

There is only 1 difference in the image URLs which is s1600 and s400. First URL with s1600 is actually the link URL. It is responsible for making this image a link. Second URL with s400 is the source URL. It displays the image.
As I've told you that the first URL is responsible for making image a link so, we need to change the first URL in our image code. For example, if I want to link the above uploaded image to my blog's homepage which is http://www.betatemplates.com/, I'll only replace the first URL of image with the URL of my blog's homepage. After that, the image code will look something like this:
<div class="separator" style="clear: both; text-align: center;"> <a href="http://www.betatemplates.com/" imageanchor="1" style="margin-left:1em; margin-right:1em"><img border="0" height="225" width="300" src="https://blogger.googleusercontent.com/img/b/R29vZ2xl/AVvXsEiU6BaE4B51gBRnm_jkVfRvhAaSHwPInzt5AQ_JosbjPHS-Uw0_vfexAhhVa6iCLfzI_SCcv2V7kpMlsbsj73hXLPLGT2RtYNz9ssmL1cCvXc6PDfSgHzKrzu9YqfcB22ZUmUpmkWxYqXs/s400/flower.jpg" /></a></div>

As you can see that I've only changed the first URL. Second URL is still an image. Now, if you'll click the following image, it will take you to my homepage.
Source
more information please visit -> http://www.betatemplates.com/2011/02/creating-picture-link-in-blogger-posts.html

How To Add Labels To Blogger Posts

Labels on Blogger blogs make it easy to categorize your blog posts. Labels are handy if you blog about a lot of different subjects, since readers can then choose to view all of your posts on, say, music at once. Or dancing, or blogging tips, or whatever you happen to be writing about. If you have a team blog, you could also give each member their own label, so you could easily read all the posts by any one of them.
When you're writing a post or editing an old post, click Labels on the side and enter the labels you like, separating them with commas. Labels you've used before will show up below, and you can just click them to add them to the post.
blogger labels
You can place single words or longer phases in the box; whatever you choose to write there, should reflect what your post is about. When you publish your post, the labels will be listed with it.
Clicking any of the labels will take you to a page containing only posts with that label. This gives readers an easy way to navigate your blog based on categories.
If you want to display some or all of your labels on the sidebar, you can make use of the Blogger "Labels" gadget. That's all.
Source
more information please visit -> http://www.ogbongeblog.com/2014/02/how-to-add-labels-to-blogger-posts.html

Thursday, 15 October 2015

How To Add Categories Section To Blogger

Blogger Blog does not support categories but has only comes with labels, In this tutorial i will show you how to manually create categories in Blogger blog. Category is a very important section of any blog or website, because with the help of categories people can easily find what they are looking for. Now we would manually create category section in blogger from labels, This tutorial is aimed at beginner bloggers, Let me explain how to add category section in blogger blog.
How To Create Categories Section To Blogger Blog
The first and easiest way to create categories section in Blogger is to rename the section of labels widget as categories. Of-course this is not the appropriate solution for a blog in which there are huge number of labels. An easy way round this problem is create a separate categories section.
Adding categories section to a Blogger blog involves following steps : 1. First of all you have to decide how you want to group your articles, according to the labels applied, and what group heading you want to give to each grouping of articles.
2. Navigate individual page of the label for first category which you want to use by clicking on the label in side bar. Copy URL address of this page. For example the URL address of the label of Blogger Widget on my site is : http://things-guide.blogspot.in/search/label/Blogger%20Widget
3. Now go to Dashboard > Layout > Add a Gadget > Link List

5. Enter "Categories" as the title
6. In the Configure Link List dialog box, paste the link of the label you've copied from the address bar to Site URL
Link List Widget blogger blog

7. Enter the name of your Category
7. Click on Add Link to add the link to your new categories list.
8. For every label you wish to put into the Categories Section copy the link and add it to the Configure Links List. By the end you will end up with two or more categories in your list
9. Use the arrow keys to each link to move them according to your choice where you want to place them.
Limit the number of posts :
You can also Limit the Number of Posts Displayed in the Categories Section. For this you will need to adjust the URL's of each label as follows :
From : http://yoursite.blogspot.com/search/label/CategoryName
To : http://yoursite.blogspot.com/search/label/CategoryName?max-results=max number of posts to display
Change the value of max results to number of posts you want to display, for example max-results=20
Source
more information please visit -> http://things-guide.blogspot.ae/2012/07/how-to-add-categories-section-to.html

How to create Static Pages in blogger or blogspot

Blogger Static Pages allows you to create specific pages like About Me, Contact page, Privacy Policy etc. on stand-alone pages that are linked from your blog. The static pages basically are the same as post pages, but there are several things that make them different. One of the differences is that static pages don't appear in the home page, don't have a label, and are not indexed as archive pages.
Step 1:- Log in to your Blogger
Step 2:-
Click on Pages
static pages blogger, blogger tutorials, widgets

Step 3:-
Click on New Page - Blank Page

Step 4:-
Type the title and write the page's content.

Step 5:-
Before publishing it, click on Preview to see how it will appear on your blog.

Step 6:-
When you have finished the editing, click on Publish button.

Step 7:-
Now you have 3 options:
Keep it as nav menu below header - Top tabs
Display the page in your blog's sidebar - Side Links
Add the page's link manually to your template - Don't Show

Step 8:-
After you have chosen where the page will appear, click on the Save arrangement button

And now you're done!
Now you have owned the static page. If you want another static page, just repeat the steps above.
Source
more information please visit -> http://helplogger.blogspot.ae/2014/05/how-to-add-static-pages-to-blogger-blog.html